
Property Management
Move-Out Checklist for PG Owners: What to Do When a Tenant Leaves


Written by
Ishika Pannu
Read Time
18 min read
Posted on
July 30, 2026
Overview
Overview
Move-Out Checklist for PG Owners: What to Do When a Tenant Leaves
Moving a tenant into your PG often gets all the attention. There are agreements to sign, deposits to collect, KYC documents to verify, and rooms to prepare. But what happens when that same tenant decides to leave is equally important, if not more.
A poorly managed move-out process can create a chain reaction of operational problems. Security deposit disputes, overlooked damages, delayed room preparation, pending dues, and prolonged vacancies can quickly eat into your revenue and impact your property’s reputation. On the other hand, a structured move-out process ensures a smoother tenant experience, protects your assets, and helps you get the room market-ready for the next occupant without unnecessary delays.
For growing PGs and co-living spaces, every move-out is an operational event, not just the end of a tenancy. It determines how quickly you can refill a room, how efficiently your staff can work, and how professionally tenants perceive your management. That’s why successful property operators don’t handle exits on a case-by-case basis. They follow a standardized move-out workflow that minimizes confusion and keeps every stakeholder on the same page.
A structured move-out process is only one part of effective tenant lifecycle management. If you’re looking to build a complete workflow from onboarding to exit, read our guide on How to Manage Move-In and Move-Out Smoothly, where we cover every stage of the tenant journey in detail.
In this guide, we’ll walk you through a practical tenant move-out checklist designed specifically for PG owners and property managers. Whether you manage a single property or multiple locations, this checklist will help you reduce disputes, improve room turnaround time, and maintain operational consistency.
Why a Structured Move-Out Process Matters
Many property owners treat move-outs as a routine administrative task. In reality, it’s one of the most critical operational stages in the tenant lifecycle. Every delay or missed step during this process can directly affect occupancy, cash flow, and tenant satisfaction.
Consider a simple scenario. A tenant vacates their room without a proper inspection. A few days later, your housekeeping staff discovers damaged furniture, unpaid electricity bills, and missing inventory. By then, the tenant has already received their security deposit, and recovering those costs becomes difficult. At the same time, the room remains unavailable for new bookings, resulting in avoidable revenue loss.
A structured move-out process prevents situations like these by creating a consistent workflow that every tenant follows before leaving the property.
Deposit-related disagreements are one of the biggest reasons move-outs become stressful. Our blog Handling Security Deposits: Legal Norms and Best Practices explains how transparent documentation and clearly defined policies can prevent most of these conflicts before they arise.
Some of the biggest advantages include:
- Faster room turnaround between tenants. When inspections, cleaning, maintenance, and documentation happen in a planned sequence, rooms become occupancy-ready much sooner, helping you reduce vacancy periods and maximize rental income.
- Fewer disputes over deposits and damages. A documented exit process supported by inspection reports, photographs, and inventory verification creates transparency for both the tenant and the property owner.
- Better operational planning for your staff. Housekeeping, maintenance teams, and front-office staff can coordinate more efficiently when move-out dates are confirmed in advance instead of being handled reactively.
- A stronger tenant experience till the very end. The move-out journey influences how tenants remember your property. A professional exit process often results in better reviews, referrals, and stronger brand credibility.

Tenant Move-Out Checklist for PG Owners
Rather than relying on memory or handling every exit differently, use the following checklist as a standard operating procedure for every tenant leaving your property.
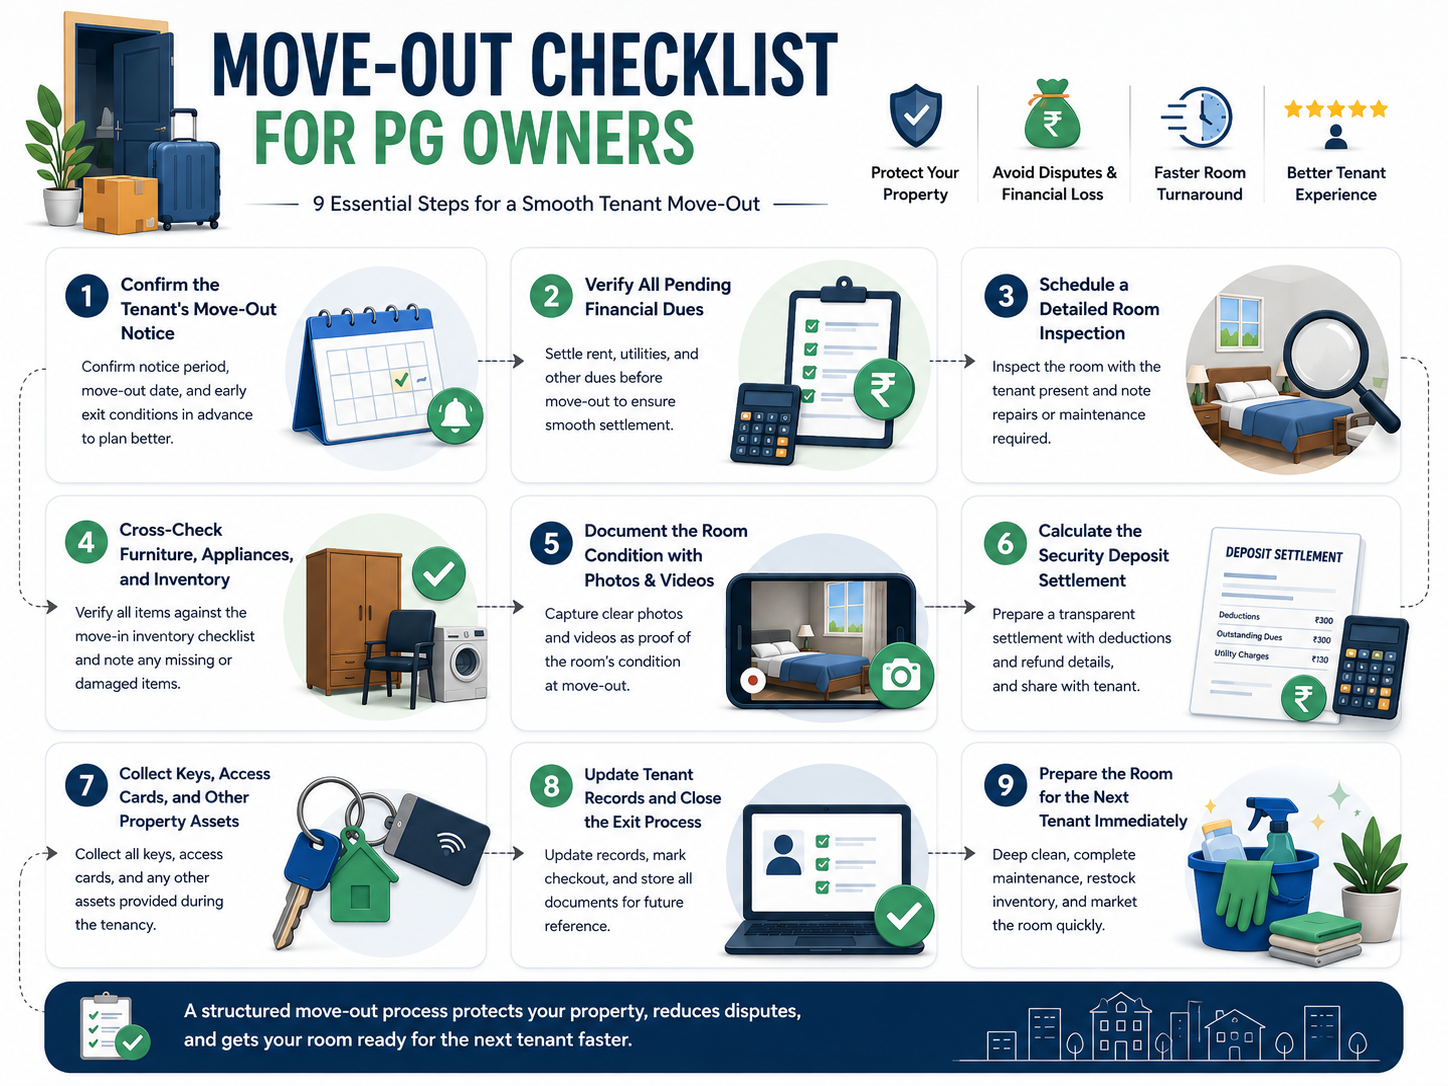
1. Confirm the Tenant’s Move-Out Notice
The move-out process should begin long before the tenant packs their belongings. As soon as a tenant communicates their intention to leave, confirm the notice period mentioned in the rental agreement and acknowledge the expected move-out date.
This gives your team enough time to prepare for inspections, schedule maintenance work, and begin marketing the room to prospective tenants. Waiting until the last day often results in unnecessary operational pressure and longer vacancy periods.
During this stage, make sure you verify:
- The official move-out date so housekeeping, maintenance, and property staff can align their schedules and avoid last-minute coordination issues.
- The applicable notice period mentioned in the agreement, along with any conditions related to early exits, lock-in periods, or advance intimation requirements.
- Whether a replacement tenant has already been identified. In some cases, existing tenants may refer a friend or colleague, allowing you to reduce vacancy time significantly.
A confirmed notice period doesn’t just help with planning, it also allows you to begin preparing the room for its next occupant well before it becomes vacant.
2. Verify All Pending Financial Dues
Before discussing the security deposit, ensure that every outstanding payment has been reconciled. Financial settlements become much easier when they’re completed before the physical handover rather than after the tenant has already left the property.
Many disputes arise simply because landlords and tenants have different assumptions about what is still payable. A structured verification process eliminates this confusion.
Review all outstanding charges, including:
- Monthly rent and advance payments to ensure there are no unpaid rental balances or adjustments that need to be considered during the final settlement.
- Electricity, water, Wi-Fi, food, or maintenance charges that may not have been included in the previous billing cycle but are still payable before the tenant exits.
- Any additional services used by the tenant, such as parking, laundry, housekeeping, or premium amenities that require final billing.
Once everything has been verified, share a detailed breakdown with the tenant instead of only communicating the final payable amount. Financial transparency becomes much easier when rent records are already well maintained throughout the tenancy. You can also explore How to Handle a Tenant Who Refuses to Pay Rent for practical strategies to improve payment tracking and reduce outstanding dues before move-out.
3. Schedule a Detailed Room Inspection
One of the biggest mistakes PG owners make is conducting a quick visual inspection after the tenant has already left. A proper inspection should ideally happen in the tenant’s presence so that observations can be discussed immediately and documented transparently.
The objective isn’t to look for reasons to deduct money from the security deposit. Instead, it’s to establish the actual condition of the room and identify any maintenance work required before the next move-in.
Since every move-out eventually becomes someone else’s move-in, following a documented inspection process helps ensure new residents receive rooms that match your property’s quality standards. Our guide How to Onboard a New Tenant in Under 10 Minutes explains why proper room preparation directly improves the onboarding experience.
A comprehensive inspection should cover:
- Furniture and fixtures, including wardrobes, study tables, chairs, beds, mattresses, and storage units, to check for damage beyond normal wear and tear.
- Electrical fittings and appliances such as fans, lights, geysers, air conditioners, charging points, and switches to ensure everything remains functional.
- Walls, flooring, doors, and windows, where scratches, stains, broken locks, damaged paint, or structural issues may need attention before the room is reassigned.
- Bathrooms and plumbing fixtures, checking taps, flush systems, showers, drainage, and sanitary fittings for leaks or maintenance requirements.
Taking the time to conduct a thorough inspection protects both the property owner and the tenant. It ensures deductions, if any, are based on documented observations rather than assumptions, creating a more professional move-out experience.
4. Cross-Check Furniture, Appliances, and Inventory
Every room in your PG is an investment, so inventory verification should go beyond a quick visual inspection. Compare the room’s current condition with the inventory checklist created during the tenant’s move-in to identify missing items, damage, or replacements before the next occupancy.
During the inspection, focus on:
- Furniture condition: Check beds, wardrobes, chairs, tables, and shelves for damage, loose fittings, or structural issues beyond normal wear and tear.
- Electrical appliances and fixtures: Test fans, lights, geysers, air conditioners, refrigerators, induction cooktops, and other provided appliances to ensure they’re functioning properly.
- Inventory items: Verify mattresses, curtains, dustbins, keys, extension boards, and other items listed in your move-in inventory. Record any missing or damaged items.
- Excessive misuse: Distinguish between normal wear and tear and avoidable damage, such as broken furniture, damaged walls, or unauthorized modifications, before finalizing the security deposit.
Using a standardized inventory checklist ensures every move-out follows the same process, regardless of which staff member conducts the inspection. It also improves documentation, reduces disputes, and helps prepare the room for the next tenant more efficiently.
A complete inventory check is just one part of a smooth tenant transition. Before welcoming a new occupant, make sure their identity verification is completed as well. Read our guide, Aadhaar-Based Digital KYC: A Step-by-Step Guide for PG Owners, to simplify and speed up the onboarding process.
5. Document the Room Condition with Photos and Videos
Even the most detailed inspection notes can become difficult to reference weeks or months later. Visual documentation provides an additional layer of transparency and protects both the property owner and the tenant if questions arise after the move-out has been completed.
Before any cleaning or maintenance work begins, capture clear photographs and short videos of the room from multiple angles. These records should be stored alongside the tenant’s move-out documentation so they can be accessed whenever required.
Make sure your documentation includes:
- Wide-angle photographs of the entire room to record the overall condition, furniture placement, and cleanliness before the room is prepared for the next occupant.
- Close-up images of any damages or maintenance issues such as chipped furniture, damaged walls, broken fixtures, or appliance defects that may require repair or influence the security deposit settlement.
- Images of utility meter readings wherever applicable. Capturing electricity or water meter readings eliminates confusion while calculating the tenant’s final utility charges.
- Photos of returned inventory and access items, including keys, access cards, parking stickers, or locker keys, ensuring there’s a documented record of everything handed back to the management.
Maintaining visual records may seem like a small administrative task, but it significantly reduces disputes and strengthens your documentation process. For properties managing frequent tenant turnover, these records become an important operational asset rather than just a compliance formality.
6. Calculate the Security Deposit Settlement Transparently
For many tenants, the security deposit settlement is the most anticipated part of the move-out process. It’s also where misunderstandings are most likely to occur if calculations aren’t communicated clearly.
Instead of simply informing the tenant about the final refundable amount, provide a detailed settlement statement that explains every adjustment. Transparency builds trust and minimizes unnecessary discussions, even when deductions are involved.
If you’re looking for a deeper understanding of deposit policies, legal considerations, and documentation practices, read Handling Security Deposits: Legal Norms and Best Practices. It explores why most deposit disputes are actually process failures rather than financial disagreements.
Your final settlement should account for:
- Outstanding rent, utility bills, or service charges that remained unpaid until the tenant’s last day at the property.
- Approved deductions for damages beyond normal wear and tear, supported by inspection reports and visual documentation rather than verbal explanations.
- Adjustments related to the rental agreement, such as notice period conditions or early exit clauses, wherever applicable and previously communicated.
- The final refundable balance, along with an expected timeline for processing the refund so tenants know when they can expect the amount to be credited.
Avoid delaying refunds without communication. Even if settlement requires additional verification, keeping the tenant informed reflects professionalism and helps maintain a positive relationship after they leave the property.
As discussed in our guide on Managing Tenant Lock-in Periods Without Conflict, most deposit-related disagreements don’t happen because of the deductions themselves, they happen because tenants don’t fully understand how those deductions were calculated. A transparent process significantly reduces friction.
7. Collect Keys, Access Cards, and Other Property Assets
The move-out process isn’t complete until every access point associated with the tenant has been returned and verified. Missing keys or unreturned access cards can create both operational inconvenience and security concerns, especially in larger PGs or managed co-living spaces.
Instead of checking these items casually during departure, include them as a mandatory step in your move-out checklist.
Verify that the tenant has returned:
- Room keys, duplicate keys, and cupboard keys issued during move-in, ensuring that no access remains with the previous occupant after the room is reassigned.
- RFID cards, biometric access devices, or smart entry credentials, if your property uses digital access management for common areas or individual rooms.
- Parking stickers, visitor access passes, or locker keys, wherever these facilities are provided as part of your property’s amenities.
- Any company-owned equipment or assets, such as induction cooktops, routers, extension boards, or other items that were issued separately from the room inventory.
If any item is missing, record it immediately and communicate the next steps before processing the final settlement. Addressing these issues after the tenant has relocated often becomes significantly more difficult.
8. Update Tenant Records and Close the Exit Process
Many PG owners complete the physical move-out but forget to update their records. As a result, inactive tenants continue appearing in occupancy reports, reminders are sent to people who have already left, and room availability doesn’t reflect the property’s actual status.
Administrative closure is just as important as the physical handover.
Maintaining accurate tenant records also makes future compliance much easier. If you’re reviewing your documentation process, our article How to Spot a Fake ID During Tenant Verification shares best practices for maintaining reliable tenant records from the very beginning.
Once the move-out has been completed, ensure your records are updated by:
- Marking the tenant as checked out across your occupancy records so active resident lists remain accurate.
- Updating room availability to help your leasing or admissions team begin marketing the room without delay.
- Recording inspection reports, settlement details, and move-out documentation in a centralized location for future reference or audits.
- Archiving tenant communication and payment history, making it easier to resolve future queries without searching through emails, spreadsheets, or messaging applications.
Accurate records improve reporting, simplify occupancy planning, and reduce administrative work as your property portfolio grows.
9. Prepare the Room for the Next Tenant Immediately
A move-out isn’t complete when the previous tenant leaves, it ends when the room is ready for the next occupant.
Every additional day a room remains vacant impacts both occupancy and revenue. That’s why leading PG operators treat room preparation as an immediate operational priority rather than waiting until a new booking arrives.
However, preparing the room is only half the equation. A fast turnaround delivers the best results when paired with an equally efficient tenant onboarding process. Follow the best practices outlined in How to Onboard a New Tenant in Under 10 Minutes to reduce vacancy periods and get rooms occupied faster.
Once the inspection is complete, begin the turnaround process without delay.
This should include:
- Deep cleaning the room, including furniture, bathrooms, windows, storage spaces, and frequently touched surfaces, so the room meets your property’s hygiene standards before the next move-in.
- Completing all pending maintenance work, such as repainting damaged walls, repairing furniture, fixing plumbing issues, replacing faulty electrical fittings, or servicing appliances identified during the inspection.
- Replenishing inventory wherever required, ensuring every room offers a consistent experience regardless of how many tenants have occupied it previously.
- Updating listings and marketing the room immediately, reducing vacancy by making the room visible to prospective tenants as soon as it becomes available.
If you want to improve communication with prospective and existing tenants during this transition, our blog on Best Communication Channels for Property Management explores how structured communication systems help reduce delays and improve operational efficiency.
Common Move-Out Mistakes That Cost PG Owners Time and Money
Small operational mistakes often cause bigger losses than major issues. Repeated oversights can lower occupancy, increase maintenance costs, and create a poor experience for both outgoing and incoming tenants. Successful PG operators continuously improve their move-out process to avoid these problems.
Some of the most common mistakes include:
- Relying on verbal communication: Record discussions about security deposit deductions, pending utility bills, and move-out dates in writing. Proper documentation reduces disputes and keeps both parties accountable.
- Refunding the security deposit too early: Always complete the room inspection and verify pending dues before processing refunds. This helps prevent financial losses from unnoticed damages or unpaid charges.
- Delaying room preparation: Clean, repair, and prepare the room immediately after move-out. Faster turnarounds reduce vacancy periods and help maximize occupancy.
- Skipping inventory verification: Inspect furniture, appliances, and other inventory using a standardized checklist, even for long-term or trusted tenants. Consistent inspections help identify missing items and damage before the next move-in.
- Not explaining the move-out process: Inform tenants in advance about inspections, utility settlements, and deposit refund timelines. Clear communication minimizes confusion and makes the move-out experience more organized.
Individually, these mistakes may seem minor, but together they create operational inefficiencies that become more costly as your property grows. By standardizing your move-out process, maintaining proper documentation, and preparing rooms without delay, you can reduce disputes, improve occupancy, and protect your property’s long-term profitability.
Create a Standard Move-Out SOP for Every Property
One of the clearest differences between small, manually managed PGs and professionally operated rental businesses is consistency.
In many properties, the move-out process depends entirely on the staff member handling it that day. One manager conducts a detailed inspection, another only checks the room visually, while someone else forgets to verify pending utility bills altogether. Over time, these inconsistencies create confusion, increase disputes, and make it difficult to maintain service quality across multiple properties.
Instead of treating every move-out differently, develop a Standard Operating Procedure (SOP) that every team member follows.
A well-defined SOP should clearly establish:
- The sequence of every move-out activity, starting from receiving the tenant’s notice and ending with preparing the room for the next occupant, so no important step is skipped during busy operational periods.
- The responsibilities of each department. Clearly define who verifies payments, conducts inspections, coordinates maintenance, approves deposit settlements, and updates occupancy records to eliminate duplication of work.
- Use standard documentation, including inspection forms, inventory checklists, settlement summaries, photographs, and acknowledgment receipts, to record every move-out consistently.
- Expected timelines for each stage, such as room inspection within 24 hours, maintenance completion within two days, or deposit settlement within the agreed timeframe. Defined timelines improve accountability while creating a more predictable tenant experience.
A documented SOP also makes onboarding new staff significantly easier. Instead of learning processes informally, employees can follow an established workflow that reflects your property’s operational standards.
As your occupancy grows, standardized processes become one of the strongest drivers of efficiency because they reduce dependency on individual staff members and create consistency across every tenant interaction.
How RentOk Simplifies the Tenant Move-Out Process
Managing tenant exits manually often means switching between spreadsheets, WhatsApp chats, paper registers, payment records, and physical agreements just to complete a single move-out. As occupancy increases, this fragmented approach makes it difficult to maintain consistency, track documentation, and prepare rooms quickly for new tenants.
RentOk helps simplify the entire move-out workflow by bringing every important operational process onto a single platform.
With RentOk, property owners and managers can:
- Track tenant move-in and move-out dates from a centralized dashboard, making it easier to plan inspections, housekeeping schedules, and occupancy without relying on manual reminders.
- Monitor pending rent, utility bills, and other dues before initiating the security deposit settlement, reducing financial discrepancies and last-minute calculations.
- Maintain complete tenant records, including agreements, payment history, occupancy timelines, and communication logs, to support every move-out with organized documentation.
- Improve room turnaround time by helping teams coordinate inspections, maintenance activities, and room availability more efficiently, allowing properties to onboard the next tenant faster.
- Manage growing operations with consistency, whether you’re handling one PG or multiple co-living properties across different locations.
Ready to Standardize Your Tenant Move-Out Process?
A well-managed move-out doesn’t just reduce disputes, it helps you protect your property’s assets, shorten vacancy periods, improve tenant satisfaction, and prepare rooms for the next occupant with confidence.
If you’re ready to replace manual tracking with a more organized approach, book a free demo of RentOk and see how you can manage tenant records, payments, move-ins, move-outs, occupancy, and day-to-day property operations from one centralized platform. Start building a smoother move-out experience for both your team and your tenants today.
Frequently Asked Questions
Find answers to common questions about this topic
About the Author
Ishika Pannu
Ishika Pannu brings you the latest insights and easy-to-apply strategies in property management—helping you simplify renting and grow with RentOk.
You may also like these
Related Articles
1 min read
RentOk vs Crib vs My PG Manager: Which PG Software Actually Fits My Business?
Written by
Posted on
Ishika Pannu
Sep 30, 2026

1 min read
Women’s Safety in PGs: What Owners Should Know
Written by
Posted on
Ishika Pannu
Sep 28, 2026

1 min read
What’s the Best Free Rent Collection App in India?
Written by
Posted on
Ishika Pannu
Sep 24, 2026
1 min read
What to Do When Your Landlord Won’t Make Repairs
Written by
Posted on
Ishika Pannu
Sep 12, 2026

1 min read
Can Landlords Ban Pets in Rental Properties? What Indian Law Says
Written by
Posted on
Ishika Pannu
Sep 11, 2026
1 min read
Why You Should Always Insist on a Registered Rent Agreement
Written by
Posted on
Ishika Pannu
Sep 10, 2026

1 min read
How Landlords Must Legally Handle Your Personal Data During Verification
Written by
Posted on
Ishika Pannu
Sep 10, 2026

1 min read
What Fire Safety Rules Must PG Owners Follow in India?
Written by
Posted on
Ishika Pannu
Sep 2, 2026

1 min read
Why Landlords Need a Property Management App in 2025
Written by
Posted on
Ishika Pannu
Sep 2, 2026

1 min read
How to Manage Multiple Rental Properties Without Spreadsheets
Written by
Posted on
Ishika Pannu
Aug 31, 2026
Stay ahead in property management with expert insights
Join thousands of property managers receiving exclusive tips delivered straight to your inbox.
Browse posts by category
Case Study
Cost of Living
Growth
Legal
Market Trends
News
Pg owner app
Property Management
Property Tax
Tech
RentOk
The easiest way to rent and manage your PGs and hostels.
Grievance Officer
Get the app


Contact us
hello@eazyapp.tech
HQ Office
COGROW, BASEMENT F-12/8A
BESIDE HOUSE OF STYLE SALON, SECTOR 28, DLF PHASE 1
GURUGRAM, HARYANA - 122002
South India Office
LUMIODESK COWORKING, 2ND FLOOR, 40, 14TH MAIN RD
BESIDE MC DONALD, 7TH SECTOR, HSR LAYOUT
BENGALURU, KARNATAKA - 560102
©️ 2026 EazyApp Tech Pvt Ltd. All rights reserved


